The wonderful wife unit was so wonderful to wonderfully hold this wonderful creation in the making
Anyway, I am having way soo much fun. Enjoy the pics and thank you everyone for the encouragement and feedback! It totally feeds the creative flow! Thank you KLRworld!
The next forming will be the edges indicated in the picture above.
They will curve towards each other, as if wrapping the bottom of the larger lamp, matching the shape of the lower part of the windshield in the KLX fairing.
So, um...for those who have worked with polycarbonate and acrylic, this may bring back old memories of frustration and humor.
What happened?
I put this piece in the toaster oven and proceeded to check my email...only to smell the fumes that would indicate the damage had been done. DOH! Homer Simpson style. This light guard was so just right, too!
Well, take a look and I'm sure you all will get the gist of the look that I'm going for. Tomorrow I'll cut another piece.
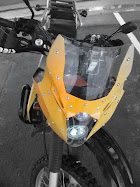
Ready to cut some plastic! Check out the future space for the visor on the fairing. The adjustable windshield will go over this.
Today's work. Used a Dremel Tool, flat file, snips, and various wt sandpaper. A fiberglass cutting wheel and 60 grit sanding bit were used with the rotary. Then I finished the curvature of the edges (KLX Fairing) with a curved blade on a hobby-knife.
Once again, a Lexan shield will be fitted into the now modified KLX fairing.
The next step will be to finish shaping the piece for the headlight-array.
On this last pic, the lamps are shown for the sake of visualization purposes. They will be mounted to a front subframe and not "epoxied" like another rider was successful in doing (ADV)...How? I have no clue
Next will be the bending of the side panels. After will be the lexan shield. And later shall be the acrylic adjustble shield.
KLX fairing mounted to Stock for the purpose of final shaping of the side panels.
Here are the day's brainstorming. Thinking about adding some sort of windshield/spoiler that will adjust up and down. Got the idea from something Touratech makes. It will probably be made of acrylic for its clarity and ability to form angles. Also the last drawing shows a lexan windshield addition to the KLX fairing.
Adjustable windshield template...still needs a little more work though. The planned angles will increase the rigidity of the acrylic and compliments the overall Face-lift. yummm!
I will be using Lexan, acrylic, and Polypropylene for material. I really find them easy to work with.
Here's how I got started on modifying the front subframe:
I removed the top bolt of the stock front subframe that attaches it to the steerer-tube mounting tab.
Then I added a few bit of steel here and a few bits of bolts there. Throw in some aluminum tubing and angles and what I got was an improvised subframe to hold everything together.
After this face lift, I will know for sure what angles and shape I like and will fab a more structurally sound piece.